Friday, March 15, 2013

"That is the sexiest cupcake I've ever eaten!"


This week is the University of Minnesota's spring break. A couple of days ago, my brother sent me a link on Facebook for a recipe for red velvet cupcakes. Yesterday he came home for a few days. Today, we got to work.
Look at those beautiful cupcakes!
 
Possibly the hardest part is waiting for them to cool.
 The recipe says to serve the cupcakes with raspberries or strawberries, so we decided to take it one step further and filled the cupcakes with raspberry preserves (cupcake filling tip can be found here). In the end, we both agreed this had been a great idea.

A batch of frosting and a few sprinkles later, we stepped back to admire our work.
Who needs a cupcake bakery when you can make these beauties?
At this point, we could wait no longer. We both picked up a cupcake, unwrapped it, and dug in. Delicious!! Moist, still just a tiny bit warm, perfect amount of raspberry filling, beautiful creamy frosting (I'll take my brother's word that the frosting is good, I don't like cream cheese frosting and had mine plain.) When finished, my brother declared with feeling, "That is the sexiest cupcake I've ever eaten!!"

Thursday, February 7, 2013

Kool-Aid and Wool


So, it’s been awhile, I guess. Ok, more than a while. Excuses are great things. Summer vacations, too much homework as a college student…but now it’s frigid February, I’ve graduated and have no job (speaking of which, if anyone wants to hire me…) no more excuses left. To start off my return to the blogosphere, I thought I would recap some of the fun things I’ve made since my last post.

First off, during the summer, a friend and I decided to try out a tutorial I found on Kool-Aid dying yarn. She knits, and I crochet, so this seemed like something right up our alley. The process is pretty simple. Take wool yarn, soak it in Kool-Aid, microwave, rinse, and let dry. And now the details.

  
 The tutorial says that one pack of Kool-Aid will dye 2 ounces of yarn, so I decided to split my yarn into 2 ounce hanks and make a bunch of fun colors. we found the easiest way to do this was with a cereal box.

 
We tied each hank loosely in a few places to keep it from tangling in the Kool-Aid. You can do this with pieces of the yarn being dyed, but I find using another color makes it easier to find them after dying. We then washed the yarn with a little laundry detergent and rinsed thoroughly.
  

And now it is time to dye (my friend and I probably had way too much fun telling anyone who asked us, that we were “dying”—I love homonyms!). The Kool-Aid went into the bowls; we mixed it with water, and then submerged the yarn.


Now this part can get a tiny bit tedious. You have to microwave each color for two minutes and then let it sit for two minutes to let it cool down so that it doesn’t boil. My friend and I swapped two colors in and out of the microwave so that when one bowl was cooking, the other was cooling, and vice versa. This worked very well, especially since we have two microwaves at my house so we could have four colors going at once. And since we were using Kool-Aid, we of course had to mix up a pitcher of the sweet stuff and take a short trip back to childhood…although I don’t think they had mango Kool-Aid when I was a kid.

You will know when the yarn is done, because the water will be clear. Really, even the grape Kool-Aid absorbed completely and the water returned to its original, straight from the tap, clear. Like this:
 
Once you reach that point, you have to let the yarn cool in the water until it reaches room temperature. It was cooler outside than inside the kitchen at this point, so out to the deck we went!!

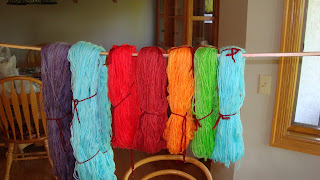
After what felt like an eternity, the water was finally cool, and we were able to continue. From here, we drained the water off, rinsed the yarn in cool water, and hung it up to let it dry.


Isn’t it pretty?? :)

I highly recommend hanging the yarn over a tub to let it dry, because as much as you wring it out, it’s still going to drip like crazy. It will probably take a few days to dry, so I suggest the guest bathroom.

Once the yarn is dry, all you have to do is wind it into a ball and figure out what you want to make with it!

And there you have it, hand dyed yarn from a pack of Kool-Aid. Whooda thunk it?? 

In the end, I do have some pointers from my own experience and from what I have read around the internet on similar tutorials:

  • ·         Apparently, this technique only works of ANIMAL fibers. If it used to have feet, you can dye it with Kool-Aid. If not, find another way.

  • ·         This is the same Kool-Aid many people might remember from childhood. It comes in a little foil packet and then you add sugar to make it sweet. DO NOT use “sugar free” Kool-Aid that contains artificial sweeteners. I can only imagine the sticky mess you would end up with. Of course, for dying yarn, you will forgo the sugar :)

  • ·         You have to cook the yarn until the water turns clear. I know it’s hard to believe, but it WILL look like clear, fresh water again. (some flavors might leave the water cloudy, like the blue I used, but in the end, it’s white cloudy) If you don’t let it cook long enough and then cool down, the colors won’t stick and will wash out when you rinse it.

  • ·         At the very end, I came up with the genius idea that this same technique can be used on the stove. Call me slow, but I finished five colors before I thought of this. It turns out that stove top actually works much better. You don’t have to let the water cool down to keep it from boiling, just turn the temperature down (and really, boiling a tiny bit isn’t going to ruin the yarn. I actually think it might have gotten done faster BECAUSE I accidentally let it boil for a few minutes.)

·         I recently found this tutorial on how to make multicolored yarn in the crock-pot with Kool-Aid. I tried it today, and it worked well. Seriously, is there anything you can’t make in a crock-pot??

Friday, May 11, 2012

Why is the Rum Always Gone??


So this week I’ve been feeling tropical and celebratory. Tropical because it’s practically summer and celebratory because it’s finals week (and now finals week is over!). I decided to let the tropical kite fly and go all out with a tropical feast: Hawaiian chicken on coconut rice, cantaloupe, Pina Coladas, and macadamia nut cookies. To add to the festivities, I happened to find the Swiss Family Robinson TV series on Hulu.


I started with the cookies. I really like that this recipe makes a smaller batch. I don't know about you, but I but in my family, the last dozen or so cookies sit on the counter/in the freezer until they become inedible and end up going to waste.
The whole batch...minus the 6-8 "test" cookies...we had to make sure they turned out, didn't we? :)

Next came the chicken.
Thank you to my wonderful Dad for taking care of the actual grilling. I probably would have either destroyed it all or killed us all with food poisoning without him :)
 At first I wasn't sure about the marinade ingredients. Soy sauce, coconut milk, onions, and brown sugar--a strange combination, but oh boy did it taste good. I let the chicken marinade overnight and am glad I did. It really penetrated the meat and flavored the chicken well. As a slight modification to the recipe, I reserved about 3 cups of the marinade when I took out the chicken and reduced it on the stove with a little bit of cornstarch to brush on the chicken a few minutes before each side was done. I'm glad I did, it really added to the flavor and "specialness" of the chicken.

I served the chicken with some coconut rice like the recipe recommended. Coconut rice is easier than you might think. If you can make rice, you can make coconut rice! All you need to do is replace half of the water with coconut milk, and tada!!


And now for the Title of this post.

This is the reason that we had virgin Pina Coladas--there was no rum. Aside from that, I never realized that they were so easy to make. After looking at probably a half dozen recipes, I felt I had a pretty good handle on it.

My recipe is:
1 14-oz can coconut milk
1 large can crushed coconut (I can't remember the oz)
6-8 oz pineapple juice frozen into cubes
1/4 cup sugar
rum
ice


Just put everything in the blender and blend until the consistency you want. Mom said it was just like an Pina Colada Orange Julius. I have no idea how much rum you want to use, but the recipe fills about 4-5 tall glasses, so use your own judgement.Since there were only three of us, we had extra. We froze it and re-blended it the next day. The consistency was more like a slushy than an Orange Julius, but the flavor was the same. I can't wait to try them with rum sometime and will let you know how they taste!

And then we ate! I think we were all surprised at how good it all really was. 
Our Hawaiian Feast...plus a salad because it's good for you!

Monday, May 7, 2012

Marble Magnets

Before I start, a friendly warning: DO NOT keep your X-acto knife blade-up in your pencil cup. This is the result: 

 
A run to the bathroom and a fun Band-Aid later…

 
We’re ready to start.

 
Today I celebrated the completion of my first final of the semester by making some fun magnets. I got the idea here. Someday when I remember to grab the newspaper before we recycle it, I’ll make magnets like they show, but today I wanted bright, fun colors. 


To make these magnets, all you need is:
Flat glass marbles (the kind that look like giant Mancala pieces)
Scraps of fabric with small, fun prints
Mod Podge
Magnets
Glue
The first thing to do is cut out a circle from the fabric that is roughly the same size as your marble. This doesn’t have to be perfect, just make sure the circle isn’t bigger than the marble.

 
Then, paint a little Mod Podge on the back (flat side) of the marble and press the fabric circle onto it PRINT SIDE DOWN. You will be able to see the back of the fabric and the front or “pretty” side will be stuck to the glue. Mod Podge dries clear, so when the magnet is dry, you will be able to see the print through the marble.


Paint Mod Podge over the back of the fabric, making sure the whole piece of fabric is covered and painting a couple millimeters beyond the edges. We don’t want the fabric to peel off later!


Once the Mod Podge is completely dry, stick the magnet to the back. Even though my magnets were the sticky-back kind, I still used a dot of hot glue to make sure they don’t pop off.

 
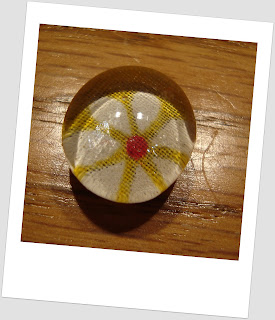
Here are all my pretty magnets hanging out on the front of the dryer


(Since the dryer is located in my sewing room, I saw no need to run downstairs and clear a space on the fridge for my pictures)
I love how the marbles magnify the design of the fabric.
What else could you use for the designs on these??


Friday, May 4, 2012

Hot Glue and Spraypaint

So I've been seeing posts around the internet (and too many to count on Pinterest) about decorating mason jars with hot glue and then spray painting over the whole thing. While I really had no use for mason jars right now, the idea caught my attention. While digging through my closet last week for something completely unrelated, I dug up a pack of canvases that I had no idea I possessed. :) Suddenly the two things clicked--using the mason jar idea on the canvas! Here's how it went.

 To create my masterpiece I used:
flat art canvas (bought in 3-packs at Michael's)
tracing paper
charcoal pencil
painters tape
template (I may be crafty, but artistic I am not)
glue gun
spray paint

 The first thing to do was to transfer my design to the canvas. If you have artistic handwriting, you could do this freehand, but my handwriting is chicken scratch so I just found a font that I liked. There may be an easier way to do the transfer but this is how I did it.

I first traced the outline of the letters. I found it is easier to fill in the letters with the glue than to trace over thin lines.
 From here, you can see the problem. If I transfer the image like this it will be backwards. To solve this problem, I turned the tracing paper over and traced went over the lines from the back. 

Remember, this is an outline, so your lines don't have to be perfect.

  From here, I taped the paper to the canvas with the word reading the right way (remember, there is writing on both sides.
 This is the reason that I used a charcoal pencil. When you apply a little pressure and rub over the words, the charcoal marks easily transfer to the canvas. I like to use a normal pencil for this step. It lets me know when I've covered the entire thing (wouldn't want to miss a letter!) and I find that the tip of a pencil exerts the perfect amount of pressure for transferring the image.
Isn't it pretty!
 Now it seems like the rest would be easy. Add glue, let dry, paint, hang...but beware!! Hot glue can be unpredictable, especially when your glue gun is probably as old as you are. I know glue guns are now made with a trigger, which I guess would make it easier to apply the glue accurately, but my gun makes you press the glue down with your thumb and that made the whole process tricky.

This is my glue gun. Notice the lack of trigger.

Here is my first attempt. I'm glad these canvases are relatively inexpensive!!
 Once you have your canvas decorated to your liking, let it dry completely. It is actually a good idea to let it dry between each letter. It is easy to catch the still sticky glue with your hand or the glue gun and smear it :(

Look what I found in the laundry room!!!! The same paint I used to repaint some things when I redecorated my room
 Now it's time to paint. Make sure you use plenty of newspaper or a drop cloth to cover your work surface and work outside or in a well ventilated area. I did my painting in the garage with the door open because it was a little windy when I was working.

 My finished product!!! It turned out better than I thought it would.

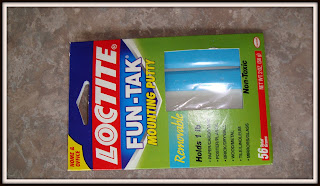
Just a note...I love this stuff. You can hang anything with it and it doesn't leave a mark!!!

A very bad picture of my very cool artwork hanging on my wall.
Are you as fascinated by this concept as I am?? Oh the possibilities!!! :)